
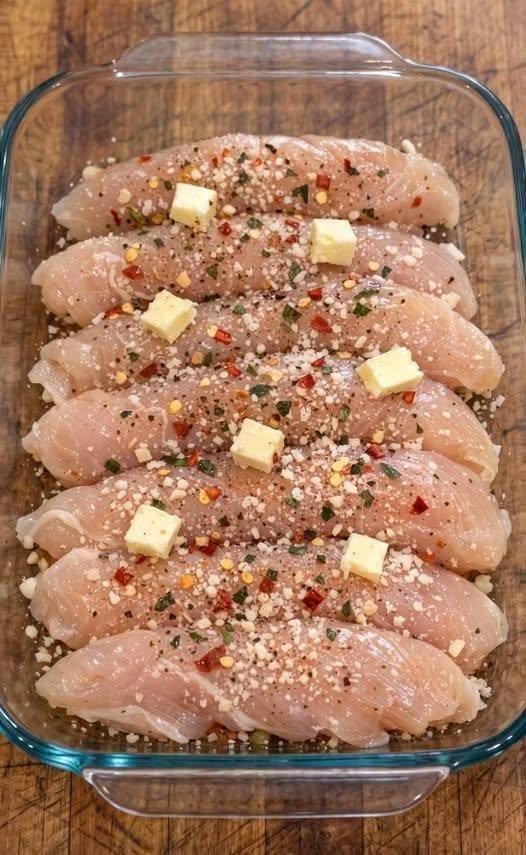
Tender, juicy chicken tenderloins baked in a glass casserole dish with garlic butter, Parmesan cheese, and flavorful herbs. This easy dump-and-bake chicken recipe requires minimal preparation and delivers a delicious, comforting dinner with buttery garlic sauce and perfectly seasoned chicken.
Recipe Information
Prep Time: 10 minutes
Cook Time: 30–35 minutes
Total Time: 40–45 minutes
Servings: 4
Cuisine: American
Course: Dinner
Cooking Method: Oven-Baked
Calories: Approximately 350 per serving
Ingredients
For the Chicken
– 1 1/2 lbs chicken tenderloins, raw
– 4 tablespoons unsalted butter, cut into small cubes
– 4 cloves garlic, minced
– 1/2 cup chicken broth
– 1 tablespoon olive oil
– 1/2 teaspoon salt, or to taste
– 1/2 teaspoon black pepper
– 1 teaspoon Italian seasoning
– 1 teaspoon garlic powder
– 1/2 teaspoon onion powder
– 1/2 teaspoon paprika
– 1/2 teaspoon red pepper flakes, optional
– 1/3 cup grated Parmesan cheese
– 1 tablespoon fresh parsley, chopped
Optional Ingredients
– 1/2 cup shredded mozzarella cheese
– 1 teaspoon dried oregano
– 1 tablespoon fresh lemon juice
– Lemon slices for garnish
Instructions
Step 1: Preheat the Oven
Preheat your oven to 400°F (200°C).
Lightly grease a glass casserole dish with olive oil or cooking spray.
Make sure your glass dish is oven-safe and suitable for the baking temperature.
Step 2: Arrange the Chicken
Pat the raw chicken tenderloins dry with paper towels.
Arrange the chicken tenderloins in a single layer inside the prepared glass casserole dish.
Keep the pieces close together but avoid overcrowding them.
Step 3: Season the Chicken
Sprinkle the chicken with salt, black pepper, garlic powder, onion powder, paprika, Italian seasoning, and red pepper flakes if using.
Add the minced garlic evenly over the chicken.
Drizzle the olive oil over the tenderloins.
Gently toss the chicken using clean utensils until the seasoning is distributed evenly.
Step 4: Add the Butter
Scatter the small cubes of butter over the chicken tenderloins.
Distribute them evenly so the butter melts throughout the casserole.
Pour the chicken broth around the chicken.
The broth will help keep the chicken moist and create flavorful cooking juices.
Step 5: Bake the Chicken
Place the casserole dish in the preheated oven.
Bake uncovered for approximately 20–25 minutes.
Cooking time depends on the thickness of the chicken tenderloins and how closely they are arranged.
Step 6: Add Parmesan Cheese
Carefully remove the casserole dish from the oven.
Sprinkle the grated Parmesan cheese evenly over the chicken.
If using mozzarella, add it at this stage as well.
Return the casserole to the oven and bake for another 5–10 minutes.
The chicken must reach an internal temperature of 165°F (74°C) in the thickest part.
The cheese should melt, and the garlic butter sauce should be bubbling gently.
Step 7: Finish the Sauce
Remove the casserole from the oven.
Add fresh parsley and lemon juice if desired.
Spoon the melted garlic butter and Parmesan sauce over the chicken tenderloins.
Allow the chicken to rest for approximately 5 minutes before serving.
Step 8: Serve
Serve the chicken tenderloins warm with the garlic butter sauce.
Pair with roasted vegetables, mashed potatoes, rice, steamed broccoli, or a fresh salad.
Enjoy this simple, flavorful chicken dinner with family and friends.
Nut Information and Allergen Details
Nut Information
This recipe contains no intentionally added tree nuts or peanuts.
– Almonds: Not included
– Walnuts: Not included
– Pecans: Not included
– Pistachios: Not included
– Cashews: Not included
– Peanuts: Not included
– Nut butter: Not included
– Nut flour: Not included
Nut allergy note: Check the labels on chicken broth, Parmesan cheese, seasonings, and other packaged ingredients for allergen statements and cross-contact warnings. Use verified nut-free products when preparing food for someone with a nut allergy.
Other Allergen Information
– Milk: Contains butter and Parmesan cheese.
– Gluten: The listed ingredients do not intentionally contain wheat or gluten, but packaged products should be checked.
– Soy: Not intentionally included; check ingredient labels.
– Eggs: Not included.
– Fish and shellfish: Not included.
– Sesame: Not intentionally included.
Allergy-Friendly Substitutions
– Dairy-free: Use dairy-free butter and a suitable dairy-free Parmesan alternative.
– Gluten-free: Use verified gluten-free chicken broth and seasonings.
– Nut-free: Check ingredient labels and prevent cross-contact.
– Lower sodium: Use low-sodium chicken broth and reduce added salt.
Nutrition Information
Estimated nutrition per serving, based on 4 servings:
Nutrient Amount
Calories 350
Protein 38g
Carbohydrates 3g
Fat 20g
Saturated Fat 10g
Fiber 0g
Sugar 1g
Sodium 650mg
Nutrition values are approximate and vary according to ingredient brands, portion sizes, and optional ingredients.
Recipe Tips
1. Use chicken tenderloins of similar thickness for even cooking.
2. Pat the chicken dry before seasoning.
3. Cut butter into small cubes so it melts evenly.
4. Avoid overcrowding the casserole dish.
5. Add Parmesan during the final minutes of baking for better flavor and texture.
6. Check the internal temperature with a food thermometer.
7. Allow the chicken to rest before serving.
8. Add spinach, mushrooms, or broccoli for extra vegetables.
Storage and Reheating
Refrigerator: Store leftovers in an airtight container for up to 3–4 days.
Freezer: Freeze cooked chicken for up to 2–3 months for best quality.
Reheating: Place the chicken in an oven-safe dish with a little chicken broth. Cover and reheat at 325°F (163°C) until heated through.
Always reheat leftovers to 165°F (74°C).
Questions and Answers (Q&A)
Q1: Can I put raw chicken tenderloins directly into a glass casserole dish?
Yes. Arrange the raw chicken in a single layer, season it, add the butter and broth, and bake in an oven-safe glass dish until the chicken reaches 165°F (74°C).
Q2: Do I need to cover the casserole dish?
No. Bake uncovered for a more flavorful, lightly browned finish. If the chicken begins browning too quickly, loosely cover the dish with foil.
Q3: Can I use chicken breasts instead of tenderloins?
Yes. Cut chicken breasts into strips of similar thickness. Larger or thicker pieces may require additional cooking time.
Q4: Can I use salted butter?
Yes. Reduce or omit the added salt because salted butter can make the dish saltier.
Q5: Can I add vegetables to this recipe?
Yes. Spinach, mushrooms, broccoli, zucchini, and asparagus are delicious additions. Adjust the cooking time according to the vegetables used.
Q6: Can I make this recipe ahead of time?
You can prepare the seasoning mixture and arrange the chicken shortly before baking. For food safety, keep raw chicken refrigerated and avoid leaving it at room temperature.
Q7: Is this recipe gluten-free?
The listed ingredients do not intentionally contain gluten. Check the labels on chicken broth, Parmesan cheese, and seasonings to confirm they are gluten-free.
Q8: Is this recipe nut-free?
There are no intentionally added nuts in the recipe. Check packaged ingredients and avoid cross-contact when preparing it for someone with a nut allergy.
Q9: Is this recipe low-carb?
Yes. The recipe is relatively low in carbohydrates because it does not contain flour, breadcrumbs, or pasta. Serve it with cauliflower rice or roasted vegetables for a low-carb meal.
Q10: What can I serve with garlic butter chicken?
Serve with mashed potatoes, rice, roasted vegetables, steamed broccoli, or a fresh Mediterranean salad.